Spiga

UPLOAD, SHARE AND EARN

Discover A Nice Tool - Word Document Map!

A Word Document Map is useful when navigating a large document. It displays a list of headings in your document in a separate left hand pane of the screen. When you use this feature, Word will create a list based on its heading styles (Heading 1, Heading 2, and so on). The headings must be formatted using one of the built-in heading styles.

When you click on any of the headings in the map, Word will quickly jump to the corresponding heading in the document. The Document Map is to assist you when you are working on your document.

To enable the Document Map

· Open a Word document that already being formatted using the heading styles.

· From the View menu, click Document Map.

· Here are the example:

To navigate a document with the Document Map

· Open a Word document that already being formatted using the heading styles.

· From the View menu, click Document Map.

· To display all headings at a specific level or higher, right-click a heading in the Document Map, and then click a number on the. For example, click Show Heading 3 to display heading levels 1 through 3.

· To collapse or expand the subordinate headings under an individual heading, click the minus (-) or plus (+) sign next to the heading.

· To close, click the Document Map from the View menu again.


Create or Modify an Email Signature


An email signature consists of text or pictures, or both. Microsoft Word provides the capability to email documents directly from Word. You can even use Word to create an e-mail signature file to be included with your messages.

To create an e-mail signature

· Open Microsoft Word.

· From the Tools menu, click Options.

· From the Options dialog box displayed, click the General tab

· Click E-mail Options button to display the E-mail Options dialog box.

· From the Email Options dialog box displayed, click the E-mail Signature tab.

· In the Type the title of your e-mail signature or choose from the list box, type a name for your signature.

· Under Create your e-mail signature box, insert the text or pictures, or both, that you want to use for a signature. (You can format the text using the available formatting tools).

· When you finish, click OK to close the Email Options dialog box.

· Click OK.

To modify an e-mail signature

· Open Microsoft Word.

· From the Tools menu, click Options.

· From the Options dialog box displayed, click the General tab.

· Click E-mail Options button to display the E-mail Options dialog box.

· From the E-mail Options dialog box displayed, click the E-mail Signature tab.

· In the Type the title of your e-mail signature or choose from the list box, click the signature you want to change.

· Under Create your e-mail signature box, make the necessary changes.

· Click Replace.

Find out The Easiest Technique To Construct A Professional Resume!


Still wondering how to write a professional resume?

Or you are looking for help? Then, here I show you how to make it within minutes!

Here is the step-by-step guides, easy way to create it using the Microsoft Word wizard.

To create a resume using the Wizard

· From the File menu, click New.

In the New Document task pane, under Templates section, click On my computer.

· From the Templates dialog box, click the Other Documents tab.

· Double-click on the Resume Wizard. This will start the Wizard, click Next to continue.

· Double-click on the Resume Wizard. This will start the Wizard, click Next to continue.

· Fill in your name and contact info before proceed by clicking Next button.

· Choose the resume standard headings according to your needs and qualifications. Remember, you need to fill up those particulars later as you tick. Click Next.

· Then, you can add some optional headings to your resume such as objectives, hobbies, etc. Click Next to continue.

· You can add extra heading that is not in the wizard as needed here. You also can rearrange the headings in the page using the Move Up and Move Down buttons. Click Next to continue.

· To finish the wizard, click on the Finish button. You can see the resume headings are added to your document and you can start entering data to your resume.

All About Microsoft Word Table...


Microsoft Word table feature enables you to organize items in columns and rows. They are easier to manipulate and read the data display in table format.

Inserting table is easy but do you really know how to manipulate it? For example, you wish to merge or split table cells, insert, resize and delete row or column…can you do it?

Here is the proper guides for you.

To create a table using the Insert Table icon

· Place the cursor at the location you wish to place the table.

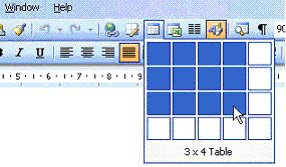
· Click on the Insert Table icon on the Standard toolbar and drag the mouse over the grid to select the number of rows and columns you required.

Note: You will notice that the maximum number of columns and rows are 4 X 5 Table. If you are creating a Microsoft Word table that is more that 4 X 5, just click on the existing grid and drag the mouse to the required columns and rows.

To enter text into a Microsoft Word table

· Click on any cell and start typing text or number to the table.

· To move from cell to cell use the Tab key or mouse click.

To resize column widths and row heights

· Change the column widths and row heights by clicking the cell dividers and dragging them with the mouse.

To select a column or multiple columns

· Move the mouse pointer to the top of the column and the cursor will change from an I-bean to a small, thick downward pointing arrow. Click to select the column.

· If you wish to select multiple columns, just drag the mouse across the columns.

To select a row or multiple rows

· Move the mouse pointer to the left of the outside table row you wish to select, until the mouse pointer changes from an I-bean to an arrow pointing upwards and to the right. Click once to select the row.

· If you wish to select multiple rows, just drag the mouse to select few rows at once.

To select the whole table

· Click anywhere inside the table.

· From the Table menu, point to Select and click on Table.

To insert a column or row into the table

· From the existing table, select the column or row where you want the new one to appear.

· From the Table menu, point to Insert and select the appropriate options: Columns to the Left / Columns to the Right / Row Above / Row Below.

To delete a column or row from the table

· Select the column(s) or row(s) you want to delete.

· From the Table menu, point to Delete and select either Columns / Rows.

To delete the entire Microsoft Word table

· Click anywhere within the table.

· From the Table menu, point to Delete and select Table.
OR click the Cut icon on the Standard toolbar.

To merge cells in a table

· Select the cells you wish to combine to make a single cell.

· From the Table menu, click Merge Cells.

To split cells in a table

· To split cells into two or more cells, select the cells you wish to split.

· From the Table menu, click Split Cells.

· From the Split Cells dialog box displayed, enter the number of columns or rows you wish to split the cell into and then select OK or press Enter.

To split a Microsoft Word table

· Place the insertion point where you want to split the table. For example, we have a table that contains 5 rows, so place the insertion point on row 3.

· From the Table menu, click Split Table.

· A blank row will appear in the table, above the current row, to create a separate table.

Paragraph Formatting


Microsoft Word paragraph formatting is the changes that will effects the entire paragraph in a document. What is the thing that you can change?

The format of a paragraph can be changed by setting tabs, indenting, aligning, changing line spacing between and within a paragraph, etc. All these features allow you to enhance the appearance of your document.

Follow the step-by-step guides below:
To apply the paragraph formatting

· Select the paragraph you want to apply the format.

· From the Format menu, click Paragraph.

· From the Paragraph dialog box displayed, do the appropriate changes and click the OK button.

To align text

· Select the text you wish to align (Recommended whole paragraph).

· In the General section Alignment menu, select one of the option:

Align Left (Ctrl+L)

Aligns text flush with the left margin. This is the default setting.

Center (Ctrl+E)

Centers text between the left and right margins.

Align Right (Ctrl+R)

Aligns text flush with the right margin.

Justify (Ctrl+J)

Spreads text evenly between the left and right margins by expanding or reducing the space between individual words.

Distributed (Ctrl+Shift+J)

Distributes text between the left and right margins. This is clear if your text is short (less than a line).

Paragraph Formatting - Indentation

Indentation determines the amount of horizontal space of the paragraph i.e. from where the starting typing point of a paragraph.

To indent a paragraph

· Select the paragraph you wish to indent or place the insertion point in the paragraph you wish to indent.

· From the Format menu, click Paragraph.

· From the Paragraph dialog box, select the Indents and Spacing tab (if not ready displayed).

· In the Indentation section, you can choose from the following options:

Left

Aligns the paragraph to the left-hand margin when you enter a positive number. Entering a negative number will align a paragraph to the left of the left-hand margin.

Right

Aligns the paragraph to the right-hand margin when you enter a positive number. Entering a negative number will align a paragraph to the right of the right-hand margin.

Special

Determines whether the indent is to be a First line or Hanging indent.

First Line

To indent the first line of the paragraph only.

Hanging

To create a Hanging indent.

None

No indentation.

By

To determines the distance of the indent from the margins, in tenths of an inch. To increase or decrease of the value, use the up and down arrows.

Paragraph Formatting - Line spacing

Line spacing determines the amount of vertical space between lines of text. The line spacing you select will affect all lines of text in the selected paragraph or in the paragraph that contains the insertion point.

To adjust line spacing

· Place the insertion point where you want to enter new text with new line spacing, or select the text you wish to modify the line spacing.

· From the Format menu, click Paragraph.

· From the Paragraph dialog box, the following options available:

Before

Adjusts the line spacing above selected lines, in point size.

After

Adjusts the line spacing below selected lines, in point size.

Line Spacing

The line spacing is automatically specified according to the tallest character on each line. The options for default line spacing include Single, 1.5 lines, Double, At least (current point size), Exactly, and Multiple lines

Single

The default setting. Specifies single spacing, does not add any additional space between lines.

1.5 Lines

Specifies one and a half line spacing, and adds half a line of additional spaces between lines.

Double

Specifies double spacing, and adds a single line of additional spaces between lines.

At least

Specifies the minimum amount of space between lines. MS Word for Windows will add any additional space required.

Exactly

Specifies a fixed amount of space between lines. MS Word for Windows will not add any additional space, even if it is required.

Multiple

Setting the line spacing to a multiple of 1.2 is equivalent to 20% and to a multiple of 0.8 is equivalent to -20%. Setting the line spacing at a multiple of 2 is equivalent to setting the line spacing at Double. In the At box, type or select the line spacing you want. The default is three lines.


Note: Proper adjust the paragraph formatting will have a big effect on the overall look of the entire paragraph and document itself.