Spiga

UPLOAD, SHARE AND EARN

Find out The Easiest Technique To Construct A Professional Resume!


Still wondering how to write a professional resume?

Or you are looking for help? Then, here I show you how to make it within minutes!

Here is the step-by-step guides, easy way to create it using the Microsoft Word wizard.

To create a resume using the Wizard

· From the File menu, click New.

In the New Document task pane, under Templates section, click On my computer.

· From the Templates dialog box, click the Other Documents tab.

· Double-click on the Resume Wizard. This will start the Wizard, click Next to continue.

· Double-click on the Resume Wizard. This will start the Wizard, click Next to continue.

· Fill in your name and contact info before proceed by clicking Next button.

· Choose the resume standard headings according to your needs and qualifications. Remember, you need to fill up those particulars later as you tick. Click Next.

· Then, you can add some optional headings to your resume such as objectives, hobbies, etc. Click Next to continue.

· You can add extra heading that is not in the wizard as needed here. You also can rearrange the headings in the page using the Move Up and Move Down buttons. Click Next to continue.

· To finish the wizard, click on the Finish button. You can see the resume headings are added to your document and you can start entering data to your resume.

All About Microsoft Word Table...


Microsoft Word table feature enables you to organize items in columns and rows. They are easier to manipulate and read the data display in table format.

Inserting table is easy but do you really know how to manipulate it? For example, you wish to merge or split table cells, insert, resize and delete row or column…can you do it?

Here is the proper guides for you.

To create a table using the Insert Table icon

· Place the cursor at the location you wish to place the table.

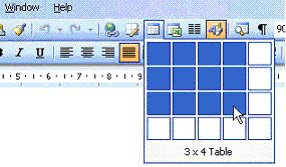
· Click on the Insert Table icon on the Standard toolbar and drag the mouse over the grid to select the number of rows and columns you required.

Note: You will notice that the maximum number of columns and rows are 4 X 5 Table. If you are creating a Microsoft Word table that is more that 4 X 5, just click on the existing grid and drag the mouse to the required columns and rows.

To enter text into a Microsoft Word table

· Click on any cell and start typing text or number to the table.

· To move from cell to cell use the Tab key or mouse click.

To resize column widths and row heights

· Change the column widths and row heights by clicking the cell dividers and dragging them with the mouse.

To select a column or multiple columns

· Move the mouse pointer to the top of the column and the cursor will change from an I-bean to a small, thick downward pointing arrow. Click to select the column.

· If you wish to select multiple columns, just drag the mouse across the columns.

To select a row or multiple rows

· Move the mouse pointer to the left of the outside table row you wish to select, until the mouse pointer changes from an I-bean to an arrow pointing upwards and to the right. Click once to select the row.

· If you wish to select multiple rows, just drag the mouse to select few rows at once.

To select the whole table

· Click anywhere inside the table.

· From the Table menu, point to Select and click on Table.

To insert a column or row into the table

· From the existing table, select the column or row where you want the new one to appear.

· From the Table menu, point to Insert and select the appropriate options: Columns to the Left / Columns to the Right / Row Above / Row Below.

To delete a column or row from the table

· Select the column(s) or row(s) you want to delete.

· From the Table menu, point to Delete and select either Columns / Rows.

To delete the entire Microsoft Word table

· Click anywhere within the table.

· From the Table menu, point to Delete and select Table.
OR click the Cut icon on the Standard toolbar.

To merge cells in a table

· Select the cells you wish to combine to make a single cell.

· From the Table menu, click Merge Cells.

To split cells in a table

· To split cells into two or more cells, select the cells you wish to split.

· From the Table menu, click Split Cells.

· From the Split Cells dialog box displayed, enter the number of columns or rows you wish to split the cell into and then select OK or press Enter.

To split a Microsoft Word table

· Place the insertion point where you want to split the table. For example, we have a table that contains 5 rows, so place the insertion point on row 3.

· From the Table menu, click Split Table.

· A blank row will appear in the table, above the current row, to create a separate table.

Paragraph Formatting


Microsoft Word paragraph formatting is the changes that will effects the entire paragraph in a document. What is the thing that you can change?

The format of a paragraph can be changed by setting tabs, indenting, aligning, changing line spacing between and within a paragraph, etc. All these features allow you to enhance the appearance of your document.

Follow the step-by-step guides below:
To apply the paragraph formatting

· Select the paragraph you want to apply the format.

· From the Format menu, click Paragraph.

· From the Paragraph dialog box displayed, do the appropriate changes and click the OK button.

To align text

· Select the text you wish to align (Recommended whole paragraph).

· In the General section Alignment menu, select one of the option:

Align Left (Ctrl+L)

Aligns text flush with the left margin. This is the default setting.

Center (Ctrl+E)

Centers text between the left and right margins.

Align Right (Ctrl+R)

Aligns text flush with the right margin.

Justify (Ctrl+J)

Spreads text evenly between the left and right margins by expanding or reducing the space between individual words.

Distributed (Ctrl+Shift+J)

Distributes text between the left and right margins. This is clear if your text is short (less than a line).

Paragraph Formatting - Indentation

Indentation determines the amount of horizontal space of the paragraph i.e. from where the starting typing point of a paragraph.

To indent a paragraph

· Select the paragraph you wish to indent or place the insertion point in the paragraph you wish to indent.

· From the Format menu, click Paragraph.

· From the Paragraph dialog box, select the Indents and Spacing tab (if not ready displayed).

· In the Indentation section, you can choose from the following options:

Left

Aligns the paragraph to the left-hand margin when you enter a positive number. Entering a negative number will align a paragraph to the left of the left-hand margin.

Right

Aligns the paragraph to the right-hand margin when you enter a positive number. Entering a negative number will align a paragraph to the right of the right-hand margin.

Special

Determines whether the indent is to be a First line or Hanging indent.

First Line

To indent the first line of the paragraph only.

Hanging

To create a Hanging indent.

None

No indentation.

By

To determines the distance of the indent from the margins, in tenths of an inch. To increase or decrease of the value, use the up and down arrows.

Paragraph Formatting - Line spacing

Line spacing determines the amount of vertical space between lines of text. The line spacing you select will affect all lines of text in the selected paragraph or in the paragraph that contains the insertion point.

To adjust line spacing

· Place the insertion point where you want to enter new text with new line spacing, or select the text you wish to modify the line spacing.

· From the Format menu, click Paragraph.

· From the Paragraph dialog box, the following options available:

Before

Adjusts the line spacing above selected lines, in point size.

After

Adjusts the line spacing below selected lines, in point size.

Line Spacing

The line spacing is automatically specified according to the tallest character on each line. The options for default line spacing include Single, 1.5 lines, Double, At least (current point size), Exactly, and Multiple lines

Single

The default setting. Specifies single spacing, does not add any additional space between lines.

1.5 Lines

Specifies one and a half line spacing, and adds half a line of additional spaces between lines.

Double

Specifies double spacing, and adds a single line of additional spaces between lines.

At least

Specifies the minimum amount of space between lines. MS Word for Windows will add any additional space required.

Exactly

Specifies a fixed amount of space between lines. MS Word for Windows will not add any additional space, even if it is required.

Multiple

Setting the line spacing to a multiple of 1.2 is equivalent to 20% and to a multiple of 0.8 is equivalent to -20%. Setting the line spacing at a multiple of 2 is equivalent to setting the line spacing at Double. In the At box, type or select the line spacing you want. The default is three lines.


Note: Proper adjust the paragraph formatting will have a big effect on the overall look of the entire paragraph and document itself.

Formatting Toolbar and Text Formatting

The formatting toolbar is a toolbar that contains icons on it as shown below. Each of the icons has a specific purpose that can change the outlook of your document text when you apply to it.

Icon

Function

Style Menu

Allows you to define a group of paragraph and character formats as a style, and then the styles in a style sheet.

Font Menu

Click the arrowhead to the right of the font name box to view the list of fonts available. Scroll down to the font you want and click once to select it.

Font Size

Click on the white part of the font size box to enter a value for the font size or click the arrowhead to the right of the box to view a list of font sizes available. Select a size by clicking on it once. A font size of 10 or 12 is best for paragraphs of text.

Font Style

Use these buttons to bold, italic and underline the selected text.

Alignment

Text can be aligned to the left, center, or right side of the page or it can be justified and distributed across the page.

Line Spacing

Allows you to set the amount of space between one line to another line.

Numbering and Bullets

It is used to set-off and emphasize sections of text and are presented by dots or numbers.

Increase/Decrease Indent

Change the indentation of a paragraph in relation to the side of the page.

Outside Border

Add a border around selected text.

Highlight

Use this option to change the color behind a selected text. The color shown on the button is the last color used. To select a different color, click the arrowhead next to the button.

Font Color

This option changes the color of the text. The color shown on the button is the last color chosen. Click the arrowhead next to the button to select another color.

To change the font used by selected text

· Select the text that you wish to apply a different font to. This can be any amount of text in the document from the single character, a word, a sentence, a paragraph, or the entire document.

· From the Format menu, click Font.

· From the Font dialog box, change from the following options:

Text font

Specifies the overall look of the character set.

Font Style

Determines the emphasis given to a character, i.e. Bold or Italic.

Size

Determines the size of the character in points. The higher the points, the larger the character will be.

Font Color

Determines the color of the text as it appears on the screen.

Underline style

Determines whether you have None, Single, Double, or Word Only underlining etc.

Underline Color

Determines the underline color of the text appears on the screen. Only available after you choose the underline style.

Strikethrough

A strikethrough line is drawn through selected characters.

Double Strikethrough

Two strikethrough lines are drawn through selected characters.

Superscript

Text is raised above its normal position on the text line.

Subscript

Text is lowered below its normal position on the text line.

Shadow

Adds a shadow behind the text.

Outline

Displays the inner and outer borders of each character.

Emboss

Text appears to be raised off the page in relief.

Engrave

Text appears to be printed or pressed into the page.

Small caps

Text is formatted in capital letters (smaller size).

All caps

Text is formatted in capital letters (normal size).

Hidden

Characters are hidden on the page.

Preview

The effect of the font is displayed before you apply it.

· When finish, click on the OK button or press Enter.

To highlight pre-selected text

· Select the text you wish to highlight.

· Click on the Highlight icon on the Formatting toolbar and the selected text will be displayed with a yellow box around it.

To remove highlighting from text

· Select the text that the highlighting is to be removed from.

· Click on the Highlight icon on the Formatting toolbar.

To change the color used for highlighting

· Click on the down arrow to the right of the Highlight icon on the Formatting toolbar. This will display a range of colors that you can select from. Once you have selected an alternative this will become the default highlight color, until you select a different color

Preface to Microsoft Word


Preface to Microsoft Word


Microsoft Word is part of the Microsoft Office. Its main function is for producing documents that can includes text, graphics, table, clip art, etc.

To start Word using the Windows Start menu

· Click on the Start button, point to Programs, following by Microsoft Office and click on Microsoft Office Word 2003.
Note: For Office previous version of Office - Click on the Start button, point to Programs and click on Microsoft Word.

· Immediately you will see the screen shown below. In the right hand side of the screen, the Getting Started task pane provides help to you.

To insert text into a document

· To enter text, just start typing! The text will appear where the blinking cursor is located. For example, you can type the following text into it accordingly. My name is

To save a file

· From the File menu, click Save.

· From the Save in drop down menu, select the location where you want to save the file or to the different folder by clicking on it.

· In the File name box, type in the file name that you would like to give (e.g. File1).

· Click on the Save button.

How To Master MS WORD Systematically?

Just follow! Yes, the Microsoft Word tutorials are structured in such a way that will cater the computer newbie needs. It’s a step-by-step instruction from the basic to more advanced features of Microsoft Word. So if you follow it carefully, there is no reason for you to fail.

Listen up…the Word tutorials below are a series of step-by-step training guides. The topics listed are devoted to a particular area of Word, to help you better digest and learn the Word features. Until eventually you'll have a thorough, in-depth understanding of the amazing, yet little used, range of benefits of the world's favorite program.


Is This FREE LEARNING activities Suitable For YOU?

This tutorial is suitable for anyone who uses computer in they daily tasks including YOU. It’s written for enormous class of people commonly referred to as users in the computer businesses. With technology evolutions, computer has become a ‘necessary’ in almost every industry. I think it is safe to say that more than 90% of the office jobs in the world today involve computer.

School, college or university students are also highly recommended to take this tutorial. The tutorials here not only can improve your computer knowledge but more importantly it helps you in preparing your paper works, course works, or assignments.


MS WORD FREE TUTORIAL

MS Word is the world most widely used word processing program and learning it is necesesary in your jobs, school projects and many more. But, its large scope of features is not easy to master.

Maybe you know some of the general Word features, but if you really wish to 'get help' to solve your daily complex tasks…you needs to have a comprehensively discovery and knowledge of the program.

Well, I am here willing to guide you towards successful using the MS Word tutorials

Systematically master of Microsoft Word will assist you a lot to use many other programs?

All the documents are much easier to produce, if you fully understand how to exploit WORD to its maximum. Also, many of the Word’s features and toolbars are ‘used’ in so many other programs; your learning curve with new software can be dramatically reduced.

Since Microsoft Word is so widely used, what happen if I tell you I have all the answers to all your questions on how to produce professional documents!

Then, you may think….REALLY?

YES, but now the question is…